Saturday 30 August 2014

FOTD: My First Face Of The Day


Today I am going to share with you my first FOTD (Face Of The Day). I am going to apologise for the pictures as I found it very difficult to take pictures of myself but hopefully over time and with practise I'll get better. I hope to make FOTDs more regular on my blog as they are a great way of showing what products look like on your skin as they can look different from when you swatch them. 

What I used: 
W7 Light Diffusing Concealer- Similar to the YSL Touche Eclat, I'm not a massive fan of this so far as it doesn't seem to do much in the way of brightening. 
ELF Clarifying Pressed Powder- This is something I bought on a whim and I've got to say I don't love it. Buying cosmetics online is very difficult because you can't actually see the products so it makes buying base products especially difficult. This powder is in the shade Ivory but sadly it is a bit too yellow for me. 
Revlon Photoready Cream Blush in Flushed- Recently I have been really getting into cream blushes. I always used to stay clear of them because I thought that they were messy and difficult to blend. However I have been really enjoying this blush. The colour looks very bright in the pot but once you've blended it out it is a very pretty pink which looks very natural. 
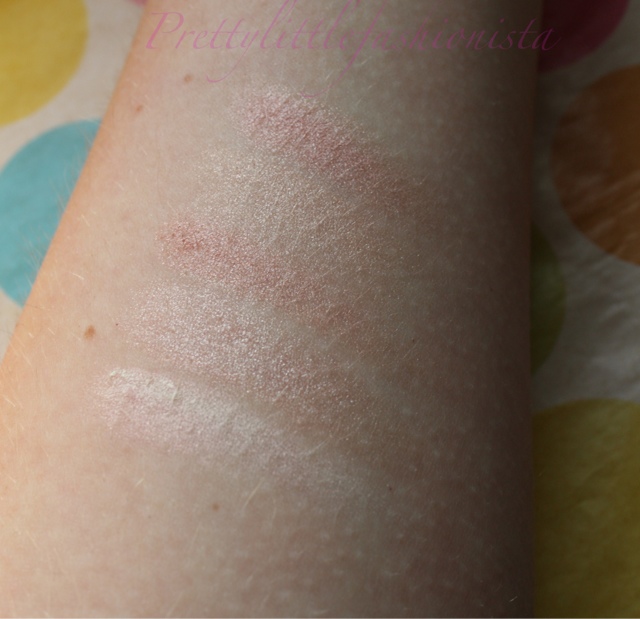
Milani Glimmer Stripes in Pink Glimmer- I really enjoy using this as a highlighter on the top of my cheekbones. It is a really pretty highlighter with a pinky shimmer to it. If applied lightly it gives a lovely glow to the skin.
MUA Undressed Palette- This palette gets a lot of love from me as it is a gorgeous neutrals palette with some fantastic eyeshadows in it. To create the look I used Shade 3(matte light brown) all over my lids, I then used Shade 4 on top of it and lastly I used a bit of Shade 10 in the crease to add a bit of definition. 
MUA Eyeliner in Black- I used this pencil eyeliner to tightline my upper waterline and also to line my lower waterline. It's a basic kohl pencil but it is only £1 so it's probably one of the cheapest available. 
Rimmel Extra Super Lash: Lash Building Mascara and Maybelline The Great Lash- Yes I use 2 mascaras, one for my top lashes and one for my bottom lashes. The Rimmel one has a curved wand which I am not a massive fan of and I find it too awkward to apply it to my bottom lashes as I always end up smudging it. The Maybelline one has a much smaller wand which is ideal for my bottom lashes. 
Rimmel Professional Eyebrow Pencil in Dark Brown (blogger fail: I forgot to photograph it)- I used to use this all the time but I realised that the colour was just not right for me. I usually use the Avon Glimmerstick in Dark Brown as I love the colour of it and I think the formula is better however I couldn't find it on this particular day so I had to use my Rimmel one. 
Rimmel Moisture Renew in Funtime Fuchsia- I really like the Moisture Renew Range from Rimmel and this is a gorgeous shade. 


I hope you guys enjoyed my first FOTD.


Prettylittlefashionista xxx
Friday 29 August 2014

NOTD: Mind The Gap Victoria


Rimmel Mind The Gap Victoria
I am a big fan of blue nails. Although my one true love is pink/red nails but from time to time I like to switch it up and I often reach for blues. When  I saw this on someone's blog I just had to have it as it looked so beautiful. In truth I think it was their wonderful photographs of it but anyway when I went to Boots the polish was mine. 

Rimmel Mind The Gap Victoria
I really like the Rimmel nail polishes as I think that they are a fantastic quality and they are so affordable. Rimmel has a very impressive range of colours. I like the 60 Seconds range as they come with a wide brush which means that you can apply the polish evenly. You only need 2 coats of this polish for it to become opaque. Despite being called the 60 Second polishes they take much longer than 60 seconds to dry but they do dry quicker than some other polishes. 

Rimmel Mind The Gap Victoria
The polish lasts for about a week before it starts to chip. When I wore this I got a lot of people asking me about this colour as it is very pretty and although it is a pastel blue it is quite bright. I am in love with this colour and it is perfect for summer.

Have you tried any Rimmel polishes? Do you have any shade recommendations? 


Prettylittlefashionista xxx

Thursday 28 August 2014

Milani Glimmer Stripes in Pink Glimmer Review


Milani Glimmer Stripes in Pink Glimmer
I picked up the Milani Glimmer Stripes in Pink Glimmer from Poundland awhile ago and I thought I would review it for you today. This is a shimmer brick very similar to what is available from other brands such as Revlon and Seventeen but this is more exciting as Miliani is not as readily available in the UK so it is interesting to try products from a brand that I can't easily get my hands on. 

Milani Glimmer Stripes in Pink Glimmer
The idea behind the Glimmer Stripes is that they can be used on your face or on your eyes. I bought the pink colour because I planned to use it on my face so I can't comment what it is like as eyeshadow. I use this as a highlighter as it is very shimmery. 

Milani Glimmer Stripes in Pink Glimmer
I really like the packaging of this product it is in a gold case with a clear lid so you can clearly see the product inside. Unlike some other drugstore brands the packaging feels very sturdy and I wouldn't be scared about taking it with me when I travel as I know that the packaging won't break. 

Milani Glimmer Stripes in Pink Glimmer

Milani Glimmer Stripes in Pink Glimmer
This is a very pretty shimmery pink toned highlighter. I apply this to the tops of my cheek bones and it looks very pretty and I think it is perfect for adding a touch of shimmer to my face. I find that I do need to apply this quite lightly as I could easily over do it and end up looking like a disco ball. I use my Real Techniques Setting Brush to apply it as I find that this brush is the perfect size for applying highlighter to the top of my cheek bones. This product is very pigmented and doesn't feel to chalk . I am intrigued to try this on my eyes and I think in the next few days I fill try using this as eyeshadow. I will update you on how this goes. 

Overall I am really impressed with this and I enjoy using it as a highlighter and if I came across any other shades I would pick them up as I think that they are they are very good products especially for the price. 

Have you tried these? Do you have any Milani recommendations? 

Prettylittlefashionista xxx

Wednesday 27 August 2014

L'Oreal Colour Infallible in Endless Chocolate Review


L'Oreal Colour Infallible in Endless Chocolate
These were talked about a lot a few years ago and I personally had avoided the hype. I didn't think they'd be my sort of product and something that hyped is surely not going to live up to your expectations. A few months ago I spotted this in a discount store and I picked it up. I really liked the colour and you can never have too many eyeshadows can you? 

L'Oreal Colour Infallible in Endless Chocolate
The idea behind the Colour Infallibles is that they are pressed pigments and they have a stopper which keeps the product pressed in place. I love the packaging of these, they have a square plastic pot which contains the product and a circular lid with the shade name on it. I think that the packaging feels very expensive and looks very pretty. I like the fact that is comes with a stopper, as what puts me off using pigments is that they can be quite messy but this isn't messy at all. 

L'Oreal Colour Infallible in Endless Chocolate
The shade Endless Chocolate is a a gorgeous dark chocolate colour which looks a bit bronzey and it looks absolutely stunning. This is perfect for a natural look but it could definitely be used for a gorgeous evening look. I love the colour of this eyeshadow, I often just wear it by it self. I just sweep a bit all over my lids and that is me done. It is a very easy product to wear and it looks stunning on. I think this colour will work for most people as it is just one of those colours that looks good on pretty much anyone. 

L'Oreal Colour Infallible in Endless Chocolate
The formula is insanely pigmented. It is very soft and easy to blend as well. The staying power is very impressive, they last all day even without using a primer. When you apply it there can be a small amount of fall out due to this eyeshadow being a pressed pigment. 

I don't know if this shade has been discontinued (I hope not) because I couldn't find it on the Boots website although they do have some of the shades. They are £6.99 each which is a little on the pricey side for an individual eyeshadow but the quality is fantastic so I would spend that money on them. I have seen these eyeshadows on a few discount websites such as Fragrance Direct so I recommend checking them out if you are interested. 

Overall I am really impressed with this eyeshadow and if I can find anymore I will most certainly be picking them up. 

Have you tried these? Any shade recommendations? 

Prettylittlefashionista xxx

Tuesday 26 August 2014

Botanics All Bright Toner Review


Botanics All Bright Toner
I bought this toner after seeing it in someone's haul video on Youtube. I have tried a few things from the Botanics range in the past and have been happy with their products so I thought I would give this a try. On a side note I have heard that Botanics have released a Micellar Water so I am very interested in trying that out. Within the Botanics range they have a variety of different ranges that are for different skin types. This is from the All Bright range. I was very interested in a product that claimed to brighten the skin. 

One of the main reasons that I bought this is because it is said to be similar to the Pixi Glow Tonic (£16.00), which is quite expensive and very difficult to get hold of. This is a much cheaper alternative (£3.99 normally although it is often on offer) and easy to get hold of as it is sold in Boots. For those of you that haven't heard of the Pixi Glow Tonic, firstly where have you been? Secondly it is a chemical exfoliant which removes the top layer of your skin to reveal fresh new skin. The Pixi Glow Tonic uses natural ingredients and is alcohol free whereas the Botanics one isn't. For me this isn't a major problem but it is something to be aware of as alcohol in skincare products can dry out your skin. 

Botanics All Bright Toner

Botanics All Bright Toner
This toner claims to tighten pores, brighten skin and leave skin feeling fresh. I use this toner after I have cleansed my skin. I pour a little bit onto a cotton pad and rub it all over my skin. I haven't really notice it tighten my pores. I have noticed that it removes impurities on my face, even after double cleanser this toner still manages to remove dirt from my face, which is good as it leaves my skin feeling very clean afterwards. My skin definitely feels much fresher after using this but it doesn't feel tight after use unlike some toners. I would recommend moisturising after using it though as the alcohol in it could dry out your skin. I think this toner also helps to brighten up my skin and help it look more healthy

In my opinion the only downside to this product is the smell. It has a floral scent but you can certainly smell the alcohol in it. The smell is not too strong though so it is still usable however if the smell was really strong I don't think I'd be able to use it. I have read that some people like the smell so it is 100% down to personal preference. 

Overall I really rate this toner as I can see a difference in my skin after I use it. In the past I have used toners that seem to do very little for my skin so I am glad to have found one that isn't too expensive but I can still see results. I really recommend this toner and the Botanics range in general as they have some really nice products. I have a my eye on a few more products from the All Bright range: the new Micellar Water, the Day and Night Cream and the Cleansing Foam Wash. 

Have you tried this toner? Do you have any Botanics recommendations?  

Prettylittlefashionista xxx

Monday 25 August 2014

Real Techniques Duo Fibre Collection Review

Today I want to review the Real Techniques Duo Fibre Collection. I've had this set for awhile now so I feel that I can now give it a full review.
Real Techniques Duo Fibre Collection
Originally this set was limited edition (hence the different style of brushes) but I believe this has been made permanent. Even if it hasn't been made permanent it is still available in Boots and Superdrug. This set is smaller than some of the other sets as it only comes with 3 brushes. The price of the set varies for different retailers the prices range from £18.64 - £23.99. 

Real Techniques Duo Fibre Collection
This time around the brushes have a white handle instead of the usual gold, pink and purple. However to keep with the colour scheme the writing on each brush corresponds to the type of brush it is. Gold is for base, pink is for finishing your look and purple is for eyes. Despite the colour scheme many of the brushes have multiple uses. 


Real Techniques Duo Fibre Collection
This set is a duo fibre set and these brushes help you to apply product lightly which can be easily built up. The set contains 3 brushes: the duo fibre face brush, the duo fibre contour brush and the duo fibre eye brush. 

Real Techniques Duo Fibre Collection
Duo Fibre Face Brush 
I really like to this brush for applying powder. As it is a duo fibre it picks up less product than a regular brush which means you get a much lighter application. The reason I like this for powder is because I can apply a light layer of powder on top of my foundation without it looking too powdery or cakey. I have found in the past using other powder brushes that my skin can look too powdery but this doesn't happen with this brush. The brush is quite soft so it feels nice when I'm applying the powder to my face. 

Real Techniques Duo Fibre Collection
Duo Fibre Contour Brush
I love this brush for helping me to contour my face. I never used to contour as I found that I was too heavy handed so I always ended up with harsh lines of bronzer on my face (very attractive). Like the powder brush this picks up a smaller amount of product which means I don't end up with harsh brown lines of bronzer on my face. This brush allows me to build up product gradually which is good for me as I can often be too heavy handed with bronzer as I am not that used to using it. I have been trying more recently to wear bronzer more and this brush really helps me to get a light application. 

Real Techniques Duo Fibre Collection
Duo Fibre Eye Brush 
This is my least used brush from the entire set. I use this brush for blending my eyeshadow but I found at first that it was much scratchier than the other brushes. After a few washes the bristles did become smoother but I still don't reach for this brush that much because I have other blending brushes that I prefer. This is good as it blends colours without removing too much of the makeup from your eye. 

I really like these brushes and I recommend this set if you are a fan of the Real Techniques brushes. 

Prettylittlefashionista xxx

Sunday 24 August 2014

Starting the University Process

So the first thing you need to do is make the decision that you actually want to go to university. I must stress that this should be your decision not your parents, friends or teachers but your decision. If you don't want to go then that is ok as there are plenty of other options for you. I know it is easy to get swept a long with the whole university process as the majority of people in your year will be going but if you don't want to go then that is fine.

Next you need to decide what course you want to do. For some people this is really easy as they have always known what they wanted to do, for others it isn't always as easy. I never actually wanted to go to university but my school encouraged everyone to start looking at courses just in case you change your mind as it is easier to pick up the process if you have already started looking at courses. I happened to stumble across Retail Management courses and I knew instantly that this was something I wanted to do. I'd actually been looking at doing retail apprenticeships so this course fit in perfectly with what I wanted to do.  

Once you have found a course you want to do start searching UCAS for universities that offer you're course. For some people they will have a list of criteria that they want from a university such as distance from home, whether it's in a big city or not. For me I found that not that many places offered the course I wanted to do so the distance from home didn't bother me too much. My firm choice university is 164 miles away from home and my insurance is 197 miles away so for me distance isn't a worry although for some people it might be. 

The best time to start looking is after you've finished your AS exams. Although you may want a break it is best to start looking early as you can start booking open days. Also I think it's good if you've got a relatively good idea of where you want to apply to when you go back to school in September. 

Although I didn't do this, during the summer holidays you could start thinking about what you are going to include in your personal statement as if you have a few ideas before you start writing it will make it a lot easier to write. 

I hope you are enjoying this series. If you have any questions please feel free to ask them? Please bear in mind that I haven't actually started uni yet and I am just talking about the process at the moment. I plan to carry on with these posts once I start uni later this year. 

Prettylittlefashionista xxx


Sunday 10 August 2014

Magazine Freebies July 2014


AddThis